AWS Redshift is a fully managed petabyte-scale data warehouse service in the cloud. You can scale this particular service up to petabytes. An AWS Redshift data warehouse is a group of cloud computing resources called nodes, this organized group is called a cluster. Each cluster runs an AWS Redshift engine and contains one and many databases.
Step 1: Create AWS Free Tier Account
In this section, we are going to see that
How to Create an AWS Free Tier Account?
What are the prerequisites you require to Create this AWS Free Tier Account?
Basically you do not require much details However just required these things So you have to have
- Credit Card or debit card to sign up AWS Account
- Working mobile number
- on which will Amazon will send you a verification code to verify that you are an authentic user
- Billing address
- For the signup, Complete Address for Billing information is required.
- This is optional but will be useful whenever you want to claim that you are using a free tier account and later you want to convert that as a business account type in AWS
- Later also you can change it while signing up if you give would be better
So this is what you required for AWS sign up and let’s go and sign up for AWS Free tier account
- Open browser and type aws.amazon.com
- Click on Complete Signup Click on Create New AWS Account
- Fill the details
- Email Address
- Password
- AWS Account Name
- Click continue Fill the contact information
- Select personal radio button Not professional because its an individual account fill all the information correctly
- Click create account
- Enter your credit/debit card information
- Click continue
- Enter mobile number
- Enter the verification number displayed on the screen and it will validate
- Hit Continue
- Click on free
- Click on sign in Console
- Now it will be redirected to the AWS Login page
- Here Enter email Address
- Type password
- Click Sign in
- That’s it you now successfully logged into AWS Console
- AWS Free tier account created successfully
Step 2: Create An IAM Role
What is AWS IAM?
Amazon Identity and Access Management, or IAM, allows you to manage access to compute, storage, database, and application services in the AWS cloud.
IAM uses Access Control Concepts, such as users, groups, and permissions, which get applied to individual API calls.
So you can specify permissions to control which users can access specific services, the kinds of actions they can perform, and which resources are available, ranging from virtual machines, database instances, and even the ability to filter database query results.
For instance, you can determine which users have MFA access to specific Amazon EC2 resources and can perform specific actions on those resources, such as, who can launch an Amazon EC2 instance.
So it’s easier to keep tabs on API activity and stay compliant. You can also integrate your existing identity system, such as Microsoft Active Directory, using standards-based federation technologies, so that IT admins and developers can administer AWS without needing additional credentials, by using one central identity management system.
You can spend less time and effort administering yet another environment while ensuring everyone gets what they need.
Security
AWS knows that security is very important for Amazon web services customers. So they have always focused on security as a top priority.
In addition to physical security certification to providing fine-grained access and data locality controls, AWS provides the infrastructure building blocks so you can build sophisticated, secure applications, which meet the regulatory and compliance standards your business requires, from ITAR to HIPAA.
IAM lets developers focus on the features and functionality of their applications, while it does the heavy lifting on the security side of things. For instance, IAM can automatically rotate access keys on your virtual machine instances, ensuring that only trusted applications and users have appropriate access at any given time.
There’s no additional charge for IAM
Create an IAM role for AWS Redshift
- Open IAM console
- Go to navigation panel and select role
- Click on Create Role
- Select –> Redshift in the service group
- Select –> Redshift Customizable then select next permissions
- On the Attach permissions policies page, choose AmazonS3ReadOnlyAccess.
- Set permissions boundary: You can leave the default setting
- Select Next for review.
- For a Role Name, enter any name of your choice for the role. For example AWSRedshiftRole
- Read all the information provided, and then select Create Role.
- Select the role name of the Redshift role you just created.
- Copy the Role ARN of the role created to your clipboard
- this information is the Amazon Resource Name (ARN) for the AWS redshift role that you just created.
So finally you have created a new role for AWS Redshift. The next step is to attach this role to the cluster. You can attach it when you launch a new cluster or you can attach this role to an existing cluster
Step 3: Create an AWS Redshift Cluster
- Open Redshift console
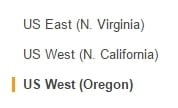
- From the main menu, choose the AWS Region in which you would like to create the cluster. For example US West (Oregon)
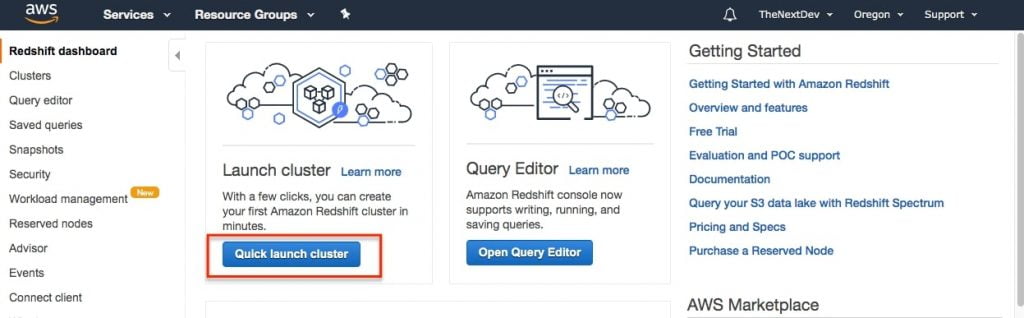
On the AWS Redshift console dashboard, click on Quick Launch Cluster
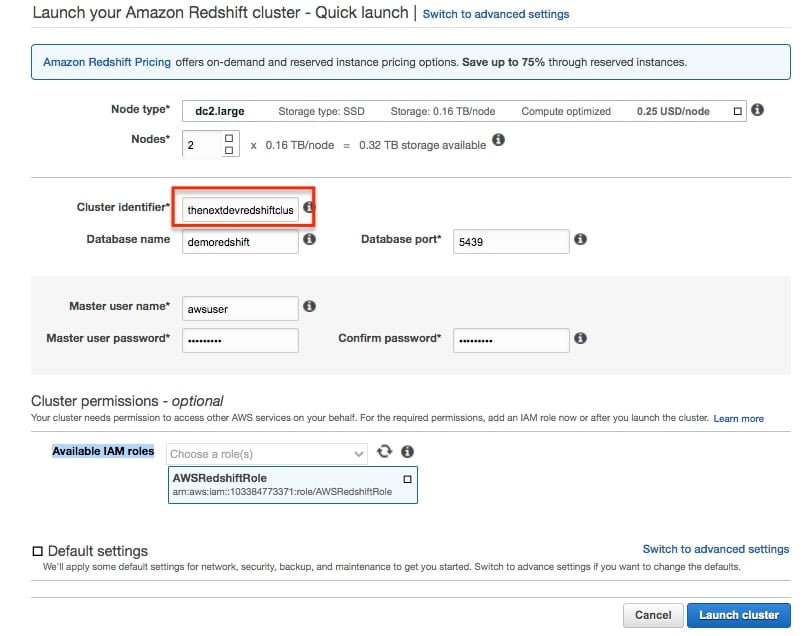
- On the Amazon Redshift cluster – Quick launch page, enter the following values and then click on Launch cluster:
- Node Type: dc2.large
- Nodes: 2
- Cluster identifier: thenextdevredshiftcluster
- Database name: demoredshift
- Database port: Keep default
- Master user name: Keep default
- Master user password & confirm password: Set password of your choice (Demo2020#)
- Available IAM roles: Select AWSRedshiftRole (This was created in IAM)
- A confirmation will be displayed. Click on View all clusters button to return to cluster list
On the Clusters page, select the cluster which you recently created and check the Cluster Status. Cluster status must be available and the database health must be healthy


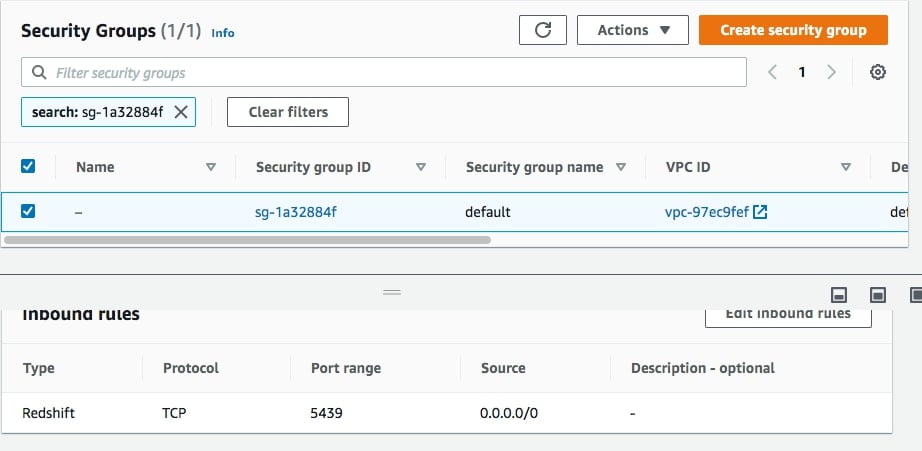
Step 4 : Authorization for cluster access
Access authorization of a cluster is required before you connect to the cluster
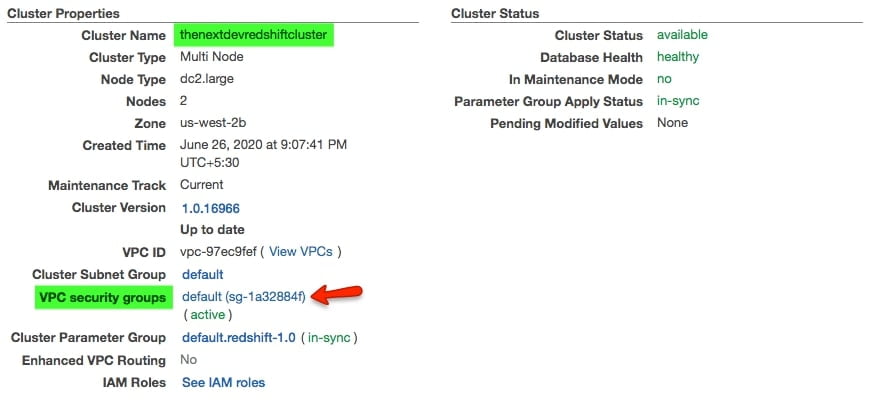
- Select the cluster thenextdevredshiftcluster and open it
- Make sure you are in the configuration tab
- Under cluster properties, → VPC security groups → Click on security group
- Once you client on security group set inbound rule
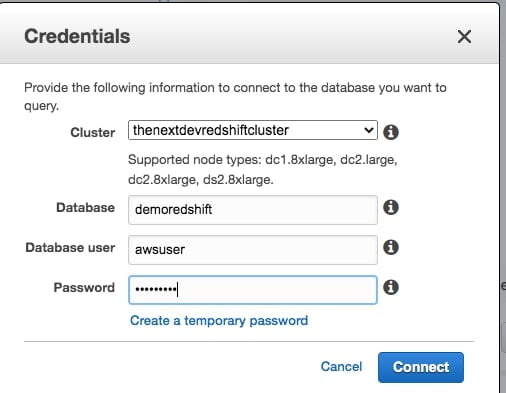
Step 5: User query editor and run queries
- Click on query editor in the left-hand panel
- Enter database details
- Connect to database
- Select public schema and execute the following query
create table book( bookName varchar (10), Publisher varchar(10));
- Table will be created
- Execute the following command in the Query editor and click on Run query to add rows to the book table.
insert into book values (‘Book1’, ‘Publisher1’), (‘Book2’, ‘Publisher2’);
- Execute following select query in the query editor
- select * from book;


